Revisiting an Old Negative
Lucky Box entry 1, the beginning of a mini-series on scanning film at home
A photo I took just about a year ago has been bouncing around in my head since I got the scan back from the lab. I had accidentally overexposed the shot by three stops (I’d been fiddling with a dial on a camera – the Mamiya 645 Pro – that was new to me), so I figured at the time that it was ruined. I even came back and re-shot the photo again when I realized my mistake, so fond of the composition I was. I almost never re-shoot like this on film, so the experience made the shot extra memorable.
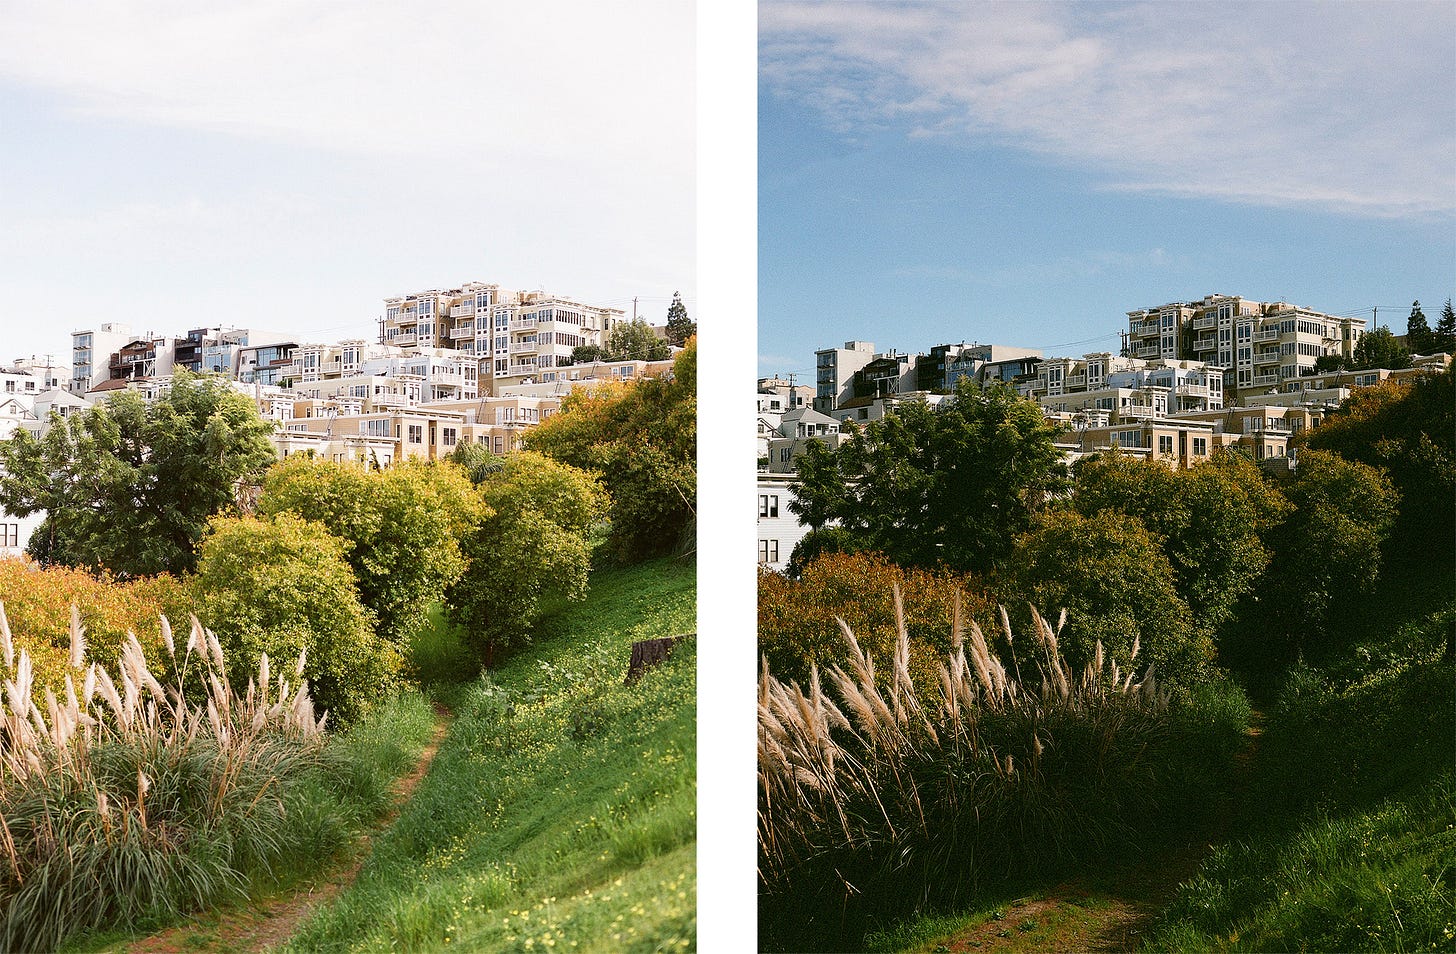
Since the film I was shooting had expired in 1996 – which I knew, but hadn’t accounted for – this mistake turned out to be a stroke of luck, as all the “correctly exposed” shots on that roll came out underexposed and grainy. Here’s the overexposed shot followed by my underexposed reshoot, both scanned by my local lab on their Noritsu HS-1800:
I prefer the image on the left to the one on the right, but the left is clearly overexposed – the sky is washed out and lacking detail, and even the darkest shadows aren’t very dark. In the image on the right, the sky looks okay, but everything else is too dark, and the shadows show the characteristic green haze of Noritsu underexposure along with heavy grain.
This photo popped back into my head because I had recently dialed in a new DSLR scanning setup and was enjoying the results and workflow compared to my old flatbed, an Epson Perfection v750 Pro. The flatbed had setup time – start up the Linux box (not strictly necessary, but this workflow allowed me to scan without my laptop plugged in at my desk), wait for the scanner to warm up, clean the always-dusty bed, mount the film in the fragile plastic holder – and it took 3-5 minutes to scan a single frame at 2400 DPI. The flatbed was only worth using for entire rolls when I could load two strips (four strips in a roll) and walk away for 20-30 minutes at a time.
Results
The DSLR setup is instant gratification – dust it off, flip on the light source, load the film, focus, and shoot. So I figured I’d pull out this negative and run it through the new system to see if I could pull any more color and detail out of the highlights. This is the result, after inverting with Negative Lab Pro and minimal tweaking:
This scan exceeded my expectations. The color palette of the expired Kodak Vericolor III 160 (VPS) – seemingly a precursor of Portra 160NC – is lovely here, with pastels throughout and soft, painterly tonal transitions in the grass and trees. Like Portra, the Vericolor appears to have tons of exposure latitude, accounting for its ability to retain detail in the sky despite the overexposure – let alone the base fog from being a quarter century out of date.
Crop
We also got some extra image out of our rescan. Here’s the lab scan superimposed onto the DSLR scan:
The lab scan was cropped. It turns out it’s pretty standard practice for labs to crop scans, and it makes sense why:
Cropping each frame perfectly to the edge is too difficult to automate and too labor intensive to do manually.
Most customers won’t ever notice or care, unless they’re doing their own scanning – and then, why would they order lab scans?
Lab scanners like the one used here apply a pretty aggressive crop to every frame by default, for the above reasons.
Assuming their scanner was even capable, if a lab did provide “full border” scans – including the image boundary and the black area around it – the average customer would be more likely to complain, either because they’d have to crop the images themselves or because the black borders would make them think, in a reversal, that their images had been cut off.
So I don’t blame the lab. In fact, I love my local lab – and it turns out that they can provide full border scans for 120 film on request! I just didn’t know that at the time.
Detail
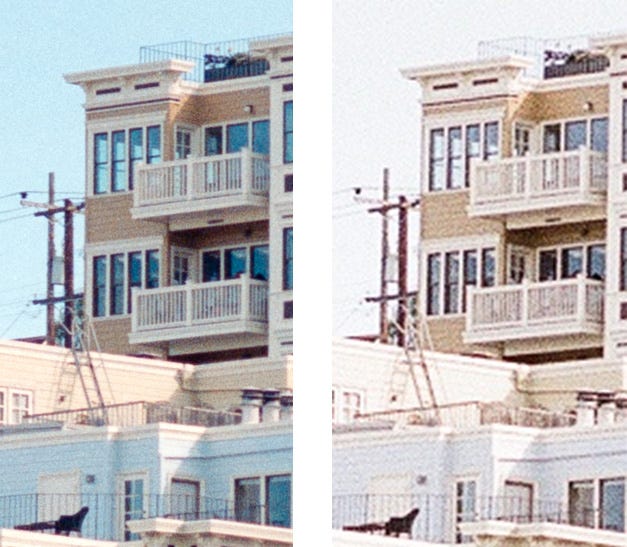
One more thing about the DSLR scan – it’s big. Here’s a close crop of the DSLR scan on the left with the lab scan scaled up to match on the right:
The DSLR is even resolving the thin fence on top of the tallest building! This is a scan of a 645 frame on 120 film, so I knew the negative had more detail than the lab scan, but this was still a pleasant surprise.
As a card-carrying pixel peeper, I get a kick out of this just for its own sake. I like pulling as much as I can out of my negatives. And if I ever print this image big, I’ll have more to work with: this will print 15” by 20” at 300 dpi for close viewing, or 45”by 60” at 100 dpi for large display!
It’s important to note that this isn’t a fair comparison of the scanning hardware – the scanner the lab used is capable of scanning at almost 2x the resolution of the lab scan shown here. But we’ll get to that in a future post.
Thanks for reading!
There are no firm takeaways from this post. In keeping with the “lucky box” theme, I’ll be throwing out a number of posts with different focus areas and styles to see what feels best. That said:
Keep your negatives, store them well, and organize them!
When in doubt, overexpose your color negative film!
Don’t be intimidated by home scanning, it can be well worth the effort.
Prints of the photo in this post are available for purchase in my online print store.
In my next post I’ll dive into my DSLR scanning setup, and in the one after that I’ll write a little background on the Noritsu HS-1800 and make some comparisons between my home setup and the Noritsu. Thanks for reading and I’d love to hear from you in the comments section!


